Materials and Tools Needed
- Fine-grit sandpaper (240-grit and 600-grit)
- Microfiber cloth
- Solid surface adhesive or epoxy
- Color-matched repair kit (optional)
- Buffing compound
- Non-abrasive cleaner
- Soft sponge or cloth
Step-by-Step Repair Process
Cleaning the Basin
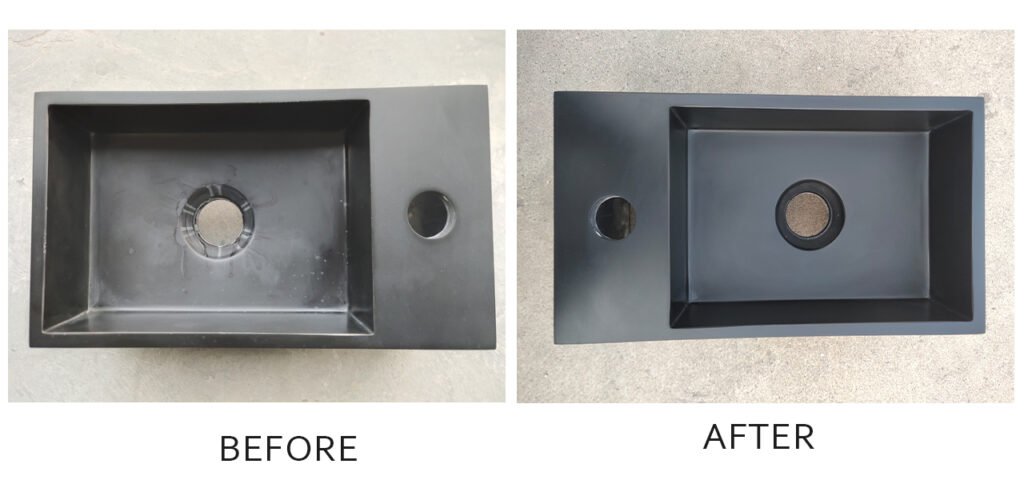
Clean the wash basin thoroughly with a non-abrasive cleaner to remove any dirt or residue. Use a soft sponge or cloth to ensure the surface is completely clean and dry before starting the repair. So if your sink just has stubborn stains, all you need is a bottle of decontamination cleanser and all problems will be solved.
Repairing Scratches
Light Scratches: Use 240-grit sandpaper to gently sand the scratched area in a circular motion. Move to 600-grit sandpaper to smooth the area further. Wipe away dust with a microfiber cloth.
Deep Scratches: Sand the area with 240-grit sandpaper first, then with 600-grit sandpaper. Apply a buffing compound to a soft cloth and buff the area until it matches the surrounding surface.
All in all, only a piece of 240 grit and 600 grit sandpaper will help you solve all your problems when faced with accidental scratches on your sink.
Fixing Chips and Cracks
Small Chips: Clean the chipped area and apply solid surface adhesive or epoxy. Press the chip back into place and hold it until the adhesive sets. Allow it to cure as per the adhesive instructions.
Large Chips or Cracks: Use a color-matched repair kit to fill the damaged area. Mix the repair compound according to the kit instructions and apply it to the crack or chip, slightly overfilling it. Allow it to cure completely.
If you’ve come to this point, it looks like you’ve got a more serious breakage problem happening with your wash baisn. The materials needed are also more specialized and not always easy to mix. However, if you purchase your wash basin from KKR®, they offer a 10-year warranty and these aftermarket issues you may never encounter.
Sanding and Smoothing
Once the adhesive or repair compound has cured, sand the repaired area starting with 240-grit sandpaper, followed by 600-grit sandpaper. Sand in a circular motion to blend the repaired area with the rest of the basin.
Buffing the Surface
Apply a buffing compound to a clean, soft cloth and buff the repaired area to restore its shine. Use light pressure and circular motions to ensure an even finish.
Final Cleaning
Wipe the entire basin with a non-abrasive cleaner and a soft cloth to remove any residue from the repair process.
Now that you’ve completed all the restoration actions, is your sink as shiny as new? Considering the long-lasting use that follows, this post also thoughtfully prepares you for routine care and maintenance for all solid surface products, including sheets, sinks, bathtubs, and kitchen countertops, and etc.
Solid Surface Care & Maintenance Tips
Daily Cleaning
- Basic Clean: Promptly clean spills with mild detergent or soapy water using a soft sponge or non-scratch scourer.
- Deep Clean: To remove tougher stains, use a diluted mild abrasive cleaner with a soft cloth in circular motions. For persistent marks, use a non-scratch scourer with the cleaner.
- Intense Clean/Repair: For extreme marks or light scratches, lightly buff the surface with fine-grade sand/glass paper.
- Softskin Basic Clean: Use warm soapy water or mild detergent with a soft cloth, rinse, and towel dry.
Preventive Measures
- Heat Resistance: KKR solid surfaces can withstand temperatures up to 360°F (182°C). While temporary contact with hot pots is tolerable, prolonged exposure to heat should be avoided. Always let cookware cool before placing it on the surface.
- Avoiding Damage: Refrain from using strong acidic or alkaline cleaners, which may harm the surface. For drain cleaners, ensure they do not come into contact with the surface and are used according to the product’s instructions.
Conclusion
Solid surface is one of the materials used for washbasins, and its solidity and durability are already superior to most common washbasin materials, such as fragile ceramics. However, in the course of daily use, there are still some small accidents that can occur. That’s okay though, restoring a solid surface wash basin is an easy task with the right materials and techniques. By following these steps above, you can restore the appearance and extend the life of your washbasin and continue to maintain the elegance and durability of your solid surface washbasin.
If you need more comprehensive repairs or lack tools, consider seeking local professional help or contacting the KKR® team. I am confident that with their 20+ years of proven experience in the solid surface industry, they will help you solve your problem. Also, if you are looking to renovate your bathroom and purchase new solid surface bathroom products, contacting KKR® would also be a great option.